Vinyl siding is one of the most durable and low-maintenance materials for a home’s exterior. However, it is not completely unbreakable. Events like a stray baseball, a strong storm, or the repeated freezing and thawing of New Jersey’s weather can lead to cracks, holes, or panels that come loose.
The good news is that many repairs to vinyl siding are simple enough for a homeowner to do on their own.
You don’t always need to hire a professional for small issues. With the right tools and a bit of patience, most people can fix minor damage themselves.
This guide walks you through how to fix damaged vinyl siding step by step, including how to handle corners. We also tell you when to call a professional instead of going the DIY route.
Why Does Vinyl Siding Get Damaged?
Before you start fixing the problem, it helps to understand what caused the damage. Vinyl siding can suffer from a variety of issues in New Jersey’s climate year-round.
- Storm damage: Storm and hail impact can crack or punch holes in panels
- Temperature shifts: Freeze-thaw cycles cause vinyl to contract in winter and expand in summer, loosening panels over time
- Sun exposure: UV rays from direct sunlight dry out the material and cause fading and brittleness over the years
- Physical impact: Lawn equipment, sports equipment, and ladder contact can dent or crack panels
- Poor original install: Improper installation with nails driven too tightly prevents natural movement and causes buckling
Once you know the cause, you can choose the right fix. A minor crack needs a different solution than a fully detached panel or a crumbling corner post.
Signs Your Vinyl Siding Needs Repair
Some damage is obvious. Other damage hides until it becomes a bigger problem. Here are the signs to look for before you start any repair.
| Type of Damage | What does it look like? | Urgency Level |
|---|---|---|
| Cracks or splits | Visible lines running across the face of a panel | Fix within 30 days |
| Small holes | Punctures or round gaps smaller than 1 inch | Fix within 30 days |
| Loose or unhooked panel | Panel flapping or sticking out from the wall | Fix immediately |
| Warping or buckling | The panel curving outward does not lie flat | Inspect the cause first |
| Damaged corner post | Corner trim is cracked, dented, or pulling away | Fix within 30 days |
| Mold or mildew under panels | Dark staining is visible from the edges or seams | Inspect for water damage first |
Act fast. Even small cracks let water get behind the siding. In NJ’s wet seasons, that moisture can cause rot, mold, and insulation damage before you know it.
Tools and Materials You Will Need
Most of these items are available at any hardware store for under $50 total.
- Zip tool (vinyl siding removal tool)
- Utility knife or tin snips
- Tape measure
- Hammer or nail puller
- Replacement vinyl panel or corner trim matched to your existing siding
- Vinyl repair filler or patch kit (for small holes)
- Medium-grit sandpaper (for corner repairs)
- Polyurethane glue (for corner patches)
|
Pro Tip: Color matching is the hardest part of any vinyl siding repair. Take a piece of your existing siding to the hardware store and compare. If your siding is older, it may have faded, and new panels will not match perfectly. |
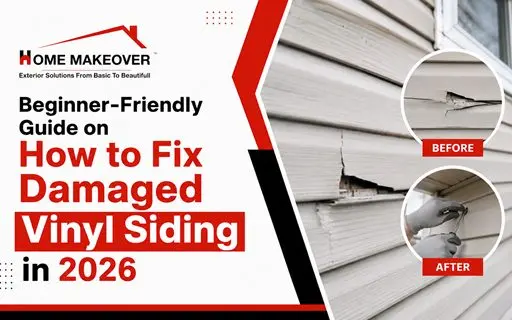
How to Fix Small Cracks and Holes in Vinyl Siding?
This is the easiest repair. It works for damage smaller than 1 inch. A patch kit or exterior filler handles most minor cracks quickly.
Step-by-Step:
- Clean the area. Wash the damaged section with soap and water. Let it dry fully before moving on.
- Apply the patch or filler. Use a vinyl repair filler like DAP Platinum Patch for holes.
- Smooth and level. Use a wet plastic putty knife to level the surface. Let it dry for 2 to 4 hours.
- Sand and paint. After it dries, lightly sand the surface with 220-grit sandpaper. Apply a vinyl-safe primer and then acrylic exterior paint to match your siding color.
| Pro Tip: Avoid dark paint colors on light siding. Dark paint absorbs heat and can cause the panel to warp over time. |
How to Replace a Damaged Vinyl Siding Panel?
If the crack is too large to patch or if the panel is fully split or warped, you will need to remove and replace it. This takes more steps but is still manageable for most beginners.
Step-by-Step:
- Unlock the panel above. Insert the zip tool under the bottom edge of the panel above the damaged one. Slide it along to unhook the locking channel.
- Remove the nails. Lift the unlocked panel slightly to expose the nails holding the damaged panel in place. Pull them out with a hammer or nail puller.
- Take out the damaged panel. Slide the old panel out carefully. Avoid bending or damaging the panels around it.
- Slide in the new panel. Lock the bottom of the replacement panel into the panel below. Push upward until it snaps into place.
- Nail it in place. Space roofing nails every 16 inches. Do not drive the nail in too tightly – leave a slight gap between the nail head and the siding. Vinyl needs room to move with temperature changes. Never nail too tightly.
- Re-lock the panel above. Use the zip tool to snap the upper panel back over the lock on the new one.
| Pro Tip:Do not glue panels down. Vinyl siding is designed to float and move slightly. Adhesive prevents natural movement and causes buckling, especially in NJ summers. |
How to Repair Damaged Vinyl Siding Corners?
Corner posts are tricky because they connect and hold multiple siding panels in place. You usually cannot remove them fully without pulling apart the surrounding siding. The easiest fix is a patch over the damaged area.
Step-by-Step:
- Measure the damage. Measure the length of the damaged section. Extend the patch at least 4 inches beyond each end for proper coverage.
- Cut the replacement piece. Use tin snips to cut a matching corner trim piece to the length you measured. Match the style and color of your existing trim as closely as possible.
- Remove nail flanges. Cut off the nail flanges on both sides of the replacement piece using tin snips. Since you are using this as a patch and not a full replacement, the flanges are not needed.
- Sand both surfaces. Use medium-grit sandpaper to roughen the underside of the patch and the surface of the damaged corner. This helps the adhesive bond properly.
- Apply polyurethane glue. Brush polyurethane glue onto the underside of the patch. Wait a few minutes until the glue becomes tacky.
- Press and hold. Center the patch over the damaged area and press firmly. Use painter’s tape to hold it in place while it dries. Let it set overnight before removing the tape.
When to Stop DIYing and Call a Pro?
Not every siding problem is a DIY job. Here is when it makes more sense to call Home Makeover LLC instead.
- Damage covers more than two or three panels on the same wall
- You find soft, rotten, or wet sheathing behind the panels
- There are signs of mold or water intrusion inside the home
- The replacement panel color does not match, and the difference is too visible
- The corner post is detached from the wall or cracked through on multiple faces
- Your siding is 15 or more years old, and damage is appearing in multiple places
In these situations, spot repairs may only delay a bigger problem. A full siding inspection can tell you whether a targeted repair or a full replacement is the smarter investment.
Frequently Asked Questions
Can I fix cracked vinyl siding myself?
Yes. Small cracks under 1 inch can be patched with a vinyl repair filler and painted over. Larger cracks that run the full length of a panel usually require the full panel to be replaced. This is still a manageable DIY job with a zip tool and a matching replacement panel.
How do I stop vinyl siding from cracking again?
Most cracking results from physical impact, UV degradation, or temperature stress caused by being nailed too tightly. Keep trees and shrubs trimmed away from the siding. Avoid pressure washing with high heat. Make sure any future repairs or installations leave the correct nail gap for natural panel movement.
How do I match the color of old vinyl siding?
Color matching is the hardest part of a vinyl siding repair. Bring a piece of your original siding to the hardware store. They can often match the shade with vinyl-safe exterior paint. If the siding is more than 10 years old, the original color may be faded, and a perfect match may not be possible. In that case, replacing the full wall section or the full home is sometimes a better long-term option.
How much does it cost to repair vinyl siding in New Jersey?
The cost depends on the size and type of damage. A DIY patch repair costs $30 to $75 in materials. If you hire a professional, a single-panel replacement in NJ typically runs $150 to $400. A partial wall repair covering a larger section costs $500 to $2,000. If the damage is widespread and a full replacement makes more sense, most NJ homeowners pay $7,000 to $16,000 for a complete vinyl siding installation. Getting a free inspection first helps you understand exactly what your home needs before spending anything.
Can damaged vinyl siding be repaired in cold weather?
Be careful with cold-weather repairs. Vinyl becomes brittle below 40 degrees Fahrenheit and can crack or shatter during removal if not handled gently. Warm the panel slightly with a heat gun on low if needed. For any significant repair, try to schedule it during milder spring or fall temperatures in NJ.
Need Help With Your Siding in New Jersey?
Home Makeover LLC has handled vinyl siding repairs and full replacements across Monmouth, Middlesex, and Mercer Counties for 20+ years. If the damage is beyond a quick DIY fix, our team can inspect, advise, and restore your siding the right way.
We are fully licensed and insured, VSI Certified, and backed by 200+ five-star Google reviews. Free in-person consultations with no obligation. Flexible financing available for qualifying projects.

About the Author: Jeffrey W. Nero
Jeffrey W. Nero is a home improvement expert with over 20 years of experience serving homeowners in New Jersey. As the owner of Home Makeover™, Jeff combines quality craftsmanship with a deep understanding of local needs. From roofing and siding to deck remodels, Jeff has helped thousands of homeowners bring their visions to life. His commitment to excellence and customer satisfaction makes him a trusted partner in transforming homes across Central NJ.